Categories
Hardware Tools

Upgrade Your Storage Every Decade!

I got a home NAS (Network Attached Storage) with a formatted volume size of about 11TB (4x4TB drives in a custom RAID). I've had a few local USB/Firewire-based home storage solutions in the past such as a Drobo, but this time I wanted to go to the network because I thought it would be more flexible. The drivers were:

  • Its good to upgrade storage periodically over your lifetime (see below)
  • The NAS is more flexible that a single-computer USB-based connection
  • It has more storage
  • The NAS device has a lot more features than a simple storage array

More on all of this below.

The model I chose is a Synology DS920+.

Synology 920+ NAS
Synology 920+ NAS

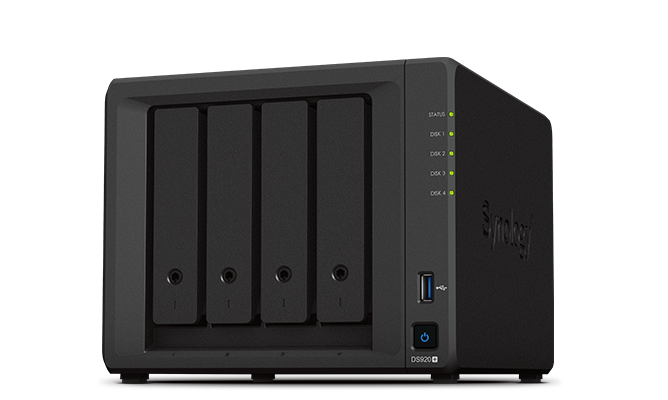
The DS920+ has four drive bays and two m.2 slots for a read/write SSD cache. This is a nice feature because you can get inexpensive high-capacity spinning disk drives and use the SSD as read/write cache to mitigate the performance issues you'd normally see on low-rpm spindle-based storage such as horrible parallel reads/writes and slow random access/seek speeds.

I got four Seagate IronWolf 4TB NAS Internal Hard Drive HDD.  These have a modest 64MB cache and only spin at 5900rpm. I also filled both m.2 slots with a pair of Samsung 500GB  970 EVO SSD's.

The DS920+ also offered a 4GB RAM expansion, bringing total RAM to 8GB. This is useful since the NAS is really a Linux computer and my gut says 8GB will give the OS more breathing room for disk cache and running various apps and protocol servers it supports.

On that note, the Synology DS920+ has a ton of apps and services and I've only scratched the surface on what I use. Some of the highlights:

  • SMB server (for WIndows sharing)
  • AFP/Bonjour server (for Mac)
  • rsync
  • NFS

SMB and AFP are pretty slow protocols and I always hate using them for large file transfers, like the multi-terabyte transfers I need to make to get all of my home videos and photos off my old Drobo. I found a great writeup on the performance of these protocols by Nasim Mansurov, here at the Photography Life blog. These protocols are great for general use, but not for the initial data-loading phase.

Part of my apprehension is not knowing the state of a large transfer, particularly if its interrupted. If I moved files and the transfer was interrupted, were they really moved?  Sometimes I'm dealing with 50k files and it's not easy to get a warm and fuzzy feeling about whether a large file transfer worked or not even if it appeared to finish. Sure, when the copy is done I could compare file counts and byte sizes between both source and destination. This would give me some confidence that I can now delete the source directory, but that's not the real problem.

The real problem is managing a large transfer and being able to optimally start/stop/resume it at will. This is trash using a GUI and AFP/SMB. For instance, if I want to resume a copy, do I need to copy the whole thing again? Do I manage the copy by doing one folder at a time and sit and wait for it to finish before starting the next folder? LOL, I've been there! Also, what happens when I find destination files that already exist? Walking into my office at 7am to check on the progress of a a twelve hour file transfer only to find that twenty minutes after I went to bed the system politely prompted me about how I want to handle a destination file conflict. I never want to be that angry holding a cup of hot coffee ever again. Screw all that.

The answer of course is rsync, a tried and true utility that's a foundation of Linux. Since the NAS is a Linux machine, it's got an rsync facility. rsync is single-purposed yet sophisticated piece of software that runs on both ends of a file transfer. The client and server both have access to their respective file systems and can negotiate a large transfer efficiently. If it's good enough for Fortune 500 companies to use in production, it's good enough for home videos of my kids fighting in their diapers.

rsync negotiates file listings and checksums on both sides of the transfer and will always do the right thing in terms of resuming a partial transfer. It's like magic.

To get this to work smoothly, I had to root into the NAS drive and change a few SSH options to allow for a more or less automated transfer. Right now I'm in the middle of what will be a 2+ day transfer of 1.6TB of home videos.

It's Good to Upgrade Storage

On a final note, I wanted to say one simple thing about why I like to upgrade my storage every decade or so. It's based on a few simple points:

  • Hard drives have a life expectancy and they don't last forever
  • New connectors and protocols are constantly getting faster and more robust
  • Old connectors and protocols are always becoming obsolete. If you plan the frequency of your copies properly, you'll always be in an era where both the old and new technology are still around and you can get adapters and whatnot to ensure the transfer is possible
  • I like to play with new things

Ok, the last point is probably the real reason. You figured me out.

Categories
Uncategorized

IntelliJ IDEA falls short on font selection

IntelliJ IDEA has a problem with selecting font variants, like variants on weight and subfamily. The UI doesn't distinguish them and only provides a coarse-grained collection in their Font dropdown. Consider the font selector:

Font selection in IntelliJ IDEA

Notice we have Iosevka and Iosevka SS09. But FontBook shows the truer picture. Look at all of those variants that aren't selectable in IntelliJ:

Font selection in MacOS FontBook

When you're running on a non-retina display, such as a 96dpi or any sub-retina resolution (notice the proper use of the term!), fonts can often look horrendous, draining all of your productivity. This is particularly true if you've got some form of font quality OCD like I have. On Retina displays, most fonts look amazing and it's just a matter of style since the fidelity of the font is preserved on these high-dpi displays.

The problem here is IntelliJ doesn't have a sophisticated enough user interface. Consider iTerm2's interface, which is top-notch:

Font selection in iTerm2

VSCode has a text-based property system and I spent a little time to figure out how it worked. The advantage of a dropdown is you know what you're getting since the dropdown choices will all be valid. But when you're entering the font name manually, you might spend some time scratching your head on exactly what name should appear. I tried entering the font name exactly as it appeared in Windows Font previewer (don't have a screenshot handy) and/or how it appears in FontBook. Here, Iosevka SS09 Extralight Extended:

FontBook's proper name for a font

But it turns out this does not work on neither the Mac or Windows. How infuriating. But, the true power of text and the CLI is that you have the ability to tweak things. This is unlike being presented with a fixed list of fonts as in IntelliJ's dropdown. Both on Windows and Mac, if you find the TTF file via Show in Finder on Mac or Show in Explorer (I think?) on Windows, you'll see the ttf filename:

Finder's listing of font variant filenames

So if you enter the filename, without the extension, into VSCode then, viola!, it works:

VSCode's font selection using the font filename, sans extension

Note, the filename has dashes so there is no need to surround the name in single-quotes as we see 'Courier New' is so decorated.

I wonder where this enhancement sits in the JetBrains issue queue? Easier than adding a more granular font selection UI, they could simply allow text-entry override for font selection. Of course this makes me wonder if I can hack this to work by going into the system config files and modifying some XML file... an effort for another day.

Not to abandon all hacks, I did spend some time fixing this for myself. You can, gulp, follow these steps:

  • Download a utility like TTF Edit
  • Open the TTF file of the variant you want to expose to IntelliJ as a unique font (so it will show up in the dropdown)
  • Modify the metadata
  • Save As to a new filename
  • Load the new file into Windows or Mac, usually by double-clicking on the file

Here is an example of where the fonts are located on my system, required by the TTF Edit's Open dialog. Good luck! Make sure you replace EVERY field of metadata wit h the new name since I'm nt sure which field is the important one that IntelliJ will use to distinguish unique fonts in its listing.

Hahahaha, have fun.

Categories
Programming

First steps in rust

I started to play around with rust and one of the first things we do when we learn a new language is write a little hello, world project. So I typed this in:

fn main() {
println!("Hello, world!");
}

I compiled via rustc main.rs and viola, my terminal shows hello world. A quick check on runtime shows it runs more or less instantaneously:

$ time ./main
Hello, world!

real 0m0.001s
user 0m0.000s
sys 0m0.000s

You may be wondering why I bothered to see how fast this was and if I told you that I've spent most of my time on the JVM over the past ten years then you'd know why I'm so paranoid.

But I digress. I looked at the binary size and saw it was 2.5M. Hmmm. My gut says that's a bit big so I wrote this little C++ program to compare:

#include <iostream>
int main(int argc, char** argv) {
std::cout << "Hello, world!" << std::endl;
return 0;
}

Sure enough the a.out was 17K. Rust must have some option to minimize for size and the docs say it's -C prefer_dynamic. When I compile the rust code, it generates a 17k binary, just like C++. yay.

But now it won't run since it's dynamically linked:

./main: error while loading shared libraries: libstd-205127404fcba336.so: cannot open shared object file: No such file or directory

Crapola where is this library. What else may be missing?

$ ldd main
linux-vdso.so.1 (0x00007ffcc23cc000)
libstd-205127404fcba336.so => not found
libc.so.6 => /lib/x86_64-linux-gnu/libc.so.6 (0x00007f6a9e912000)
/lib64/ld-linux-x86-64.so.2 (0x00007f6a9eb14000)

Oh, just that one. Linux's locate didn't find it. I thought I saw a ~/.cargo directory somewhere.

find ~/.cargo/ -name "libstd*"

Nope. How about:

find ~/.rustup -name "libstd*"
./.rustup/toolchains/stable-x86_64-unknown-linux-gnu/lib/rustlib/src/rust/src/libstd
./.rustup/toolchains/stable-x86_64-unknown-linux-gnu/lib/rustlib/wasm32-unknown-unknown/lib/libstd-077104c061bb2ffc.rlib
./.rustup/toolchains/stable-x86_64-unknown-linux-gnu/lib/rustlib/x86_64-unknown-linux-gnu/lib/libstd-205127404fcba336.so
./.rustup/toolchains/stable-x86_64-unknown-linux-gnu/lib/rustlib/x86_64-unknown-linux-gnu/lib/libstd-205127404fcba336.rlib
./.rustup/toolchains/stable-x86_64-unknown-linux-gnu/lib/rustlib/x86_64-unknown-linux-gnu/analysis/libstd-205127404fcba336.json
./.rustup/toolchains/stable-x86_64-unknown-linux-gnu/lib/libstd-205127404fcba336.so
./.rustup/toolchains/stable-x86_64-unknown-linux-gnu/share/doc/rust/html/unstable-book/library-features/libstd-sys-internals.html
./.rustup/toolchains/stable-x86_64-unknown-linux-gnu/share/doc/rust/html/unstable-book/library-features/libstd-thread-internals.html
./.rustup/toolchains/stable-x86_64-unknown-linux-gnu/share/doc/rust/html/unstable-book/library-features/libstd-io-internals.html

There you are you wascolly rabbit! But I don't know enough about rust to say if this is recommended approach:

LD_LIBRARY_PATH=./.rustup/toolchains/stable-x86_64-unknown-linux-gnu/lib/rustlib/x86_64-unknown-linux-gnu/lib ./main
Hello, world!

But who cares that worked!

Categories
DevOps

Through the rabbit hole I found a blank screen

With my home lab, which I affectionately named SINGULARITY, I mostly interact with it via ssh over my home network. However, I've been tweaking BIOS settings a lot so I hooked the PC up to my wifes' keyboard/video/mouse and was doing a lot of reboots.

But then I stopped tweaking and went back to using the machine as a node on my network. But as I sat there doing my work I started feeling anxious and I didn't know why. I felt as though someone were watching me. Try as I may, I couldn't shake this anxious feeling. It turns out that the login prompt was showing and the monitor wasn't turning off! Mercy me!

I run the machine headless, which means its running at a lower runlevel, so I had no GUI tools or screensaver to set.

Incidentally, I enabled the low runlevel by issuing this simple command:

sudo systemctl set-default multi-user.target

If I wanted the GUI back, I'd just do:

sudo systemctl enable graphical.target --force
sudo systemctl set-default graphical.target

But I digress.

I poked around and didn't find a direct solution. It did seem like the command I wanted to run was setterm -blank 1, which would blank the screen and put the monitor into power-save mode. This is exactly what i wanted but the command vomits if you set it in a remote terminal, like Windows Terminal:

$ setterm -blank 1
setterm: terminal xterm-256color does not support --blank

After a little experimenting, I found that when I'm logged directly into the terminal, $TERM is set to linux. So with this little bit in my .bashrc, I was able to run setterm -blank 1 only when I'm logged in locally:

if [ "$TERM" == "linux" ]; then
setterm -blank 1
elif [ -e /usr/share/terminfo/x/xterm-256color ]; then
export TERM='xterm-256color'
else
export TERM='xterm-color'
fi

Great! Now when I login, a minute of inactivity blanks the monitor!

But the problem here was on reboot, I wouldn't be logged in. So I dived into login details more and found there's a file called /lib/systemd/system/getty@.service that specifies the command used for the login prompt:

ExecStart=-/sbin/agetty -o '-p -- \u' --noclear %I $TERM

Still, I didn't see a way to inject setterm -blank 1 in there. But agetty does take a -l parameter allowing you to specify a login program. So I created /bin/login2:

!/usr/bin/sh
setterm -blank 1
/bin/login $*

That's so ugly I love it! I then invoked this piece of art from agetty:

ExecStart=-/sbin/agetty -l /bin/login2 -o '-p -- \u' --noclear %I $TERM

After a reboot, I found this did not work at all.

Why? because agetty blocks on awaiting login name. It queries for a login name and then passes it to /bin/login. So setterm -blank 1 within login2 does not get invoked until you enter the login name. Damn.

But wait, there's more! agetty also takes a -a argument, autologin name! So I descend further into the rabbit hole and create this beauty:

ExecStart=-/sbin/agetty -a nic -l /bin/login2 -o '-p -- \u' --noclear %I $TERM

This bypassed the username prompt, executed setterm -blank 1, but this left me with an awkward prompt for the password, and this filled me with even more anxiety than the original non-blanking screen!

I saw that /bin/login can take a -f argument to force a login. Documentation says "Do not perform authentication, user is preauthenticated." Hahahah, so of course I went ahead and added it. Fuck it, it's a home lab and this is only a security vulnerability for local access.

Now when I reboot, I basically get logged in automatically. But then, at this point, my .bashrc does the job of calling setterm -blank 1 so why the hell do I need /bin/login2 for?

Sooooo... I started thinking about if I can pass -f from the original agetty invocation and found that yes, this is possible. That's what the -o option is for. Now I can get rid of /bin/login2 and just have this:

ExecStart=-/sbin/agetty -a nic -o '-f -p -- \u' --noclear %I $TERM

QED

Categories
DevOps

Home Kubernetes Lab

Over the weekend, I created a home lab. I had an aging PC that had windows on it and I decided to wipe it away and install Ubuntu.

I created a home lab late last year on my main PC, but I didn't like having all of that infrastructure on a PC where I did general purpose programming and gaming. Right off the bat, Windows hypervisor and the VM's I'd need for a proper lab took up precious RAM. And there was also the matter of having the VM's up and running as nodes in my Kubernetes cluster, having Rancher running etc. It all seemed like extra baggage for my PC which I wanted to be as lean as possible and ready to handle large tasks (like running games) using all of the resources in the machine.

So this PC has 16GB of RAM and an i5 4-core processor.  It's unfortunate that I have 32GB of DIMMs installed on the box. My mother board says it supports 32GB of RAM but for some reason I can't get the BIOS to recognize it. Turns out to a CLI-only Ubuntu, this is all of the power I need. Anyway, figuring out how to use the other 16GB of ram is an Area of Research! The box has an old SSD I pulled from my old Apple Mac Pro and performance of everything is just lightning.

When it came to a hypervisor to use, I chose kvm. It seemed like the right choice for my needs and did't take a lot of know-how to get working. This link helped: https://help.ubuntu.com/community/KVM/Installation

When it came to VM's to create, I used this Minimal CD image of Ubuntu: https://help.ubuntu.com/community/Installation/MinimalCD. During the installation of each VM, I chose OpenSSH server only since that's all I needed. VM installation was still manual and a little time-consuming. At some point I hope to automate it, but since I only have 16GB of RAM, I'm only creating 203 VM's as Kubernetes worker nodes and that will be that.

A few useful installs:

  • sudo apt install libguestfs-tools
  • sudo apt install virtinst
  • sudo apt install libosinfo-bin
  • sudo apt install cpu-checker

I decided to use Rancher as the k8s cluster management layer since we use that at work and I figure it would be a good idea to get more familiar with it. Obviously the new server needed docker and this article was helpful in describing how to get docker to install properly on Ubuntu: https://docs.docker.com/engine/install/ubuntu/. It turns out just saying "apt install docker.io" is not the best choice. You need a few extra steps.

Rancher was up and running without much effort. Rancher runs in a container directly on the host, on a server I call SINGULARITY. I have two VM's called star01 and star02 which run as work nodes. star01 also runs etcd and the control plane. I'll probably create a new VM star03 soon so I can experiment with deploying various software in clusters which require 3+ nodes, but I can prob get by with 2-nodes for a while.

An open item is having star01/02 DNS available on my LAN without using a bridged network. I tried implementing the technique described here, but it didn't work on my first try. I'll have to try again. It would probably help if I understood NetworkManager and DNS better. More areas of research!

A few things I'm interested in learning about in the short term:

  • How to create a docker image that manipulates mounts on the host for external storage for configuration. Rancher does this and it's kind of magic to me right now.
  • Figure out how to have all of my kvm guest hostnames recognized on the host, if not my entire home LAN.
  • How to backup my Rancher and cluster configuration so I can restore it if I want to blow away my lab and start from scratch. This blog post is good documentation if I want to start over, but obviously I'd rather automate away the toil.

Some useful commands:

  • Make sure your kvm guests restart after host reboot: virsh autostart vmName
  • List kvm guests and their IP addresses: virsh net-dhcp-leases default
  • Dump network details: sudo virsh net-dumpxml default
  • Edit network details: sudo virsh net-edit default

Ciao for now.